■ 개요
- OS : Linux/Ubuntu/24.04.3LTS
- 웹사이트에 검색창을 구현하는 것부터 위협 탐지를 위한 보안 데이터 분석까지 다양한 사용 사례를 지원하는 분산형 검색 및 분석 엔진
- '분산형'이라는 용어는 여러 컴퓨터에서 OpenSearch를 실행할 수 있음을 의미
- 검색 및 분석은 OpenSearch에 데이터를 수집한 후 검색 및 분석할 수 있음을 의미
- 데이터 유형에 관계없이 OpenSearch를 사용하여 데이터를 저장하고 분석할 수 있
- Apache 2.0 라이선스 기반의 오픈 소스
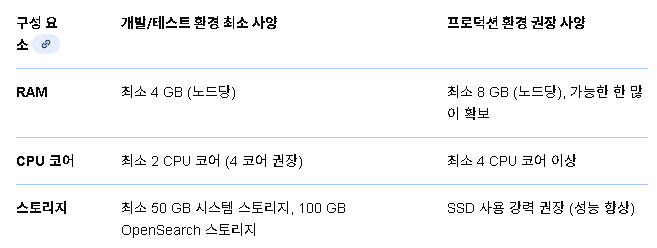
- 사양
■ 작업순서 (OpenSearch)
- https://docs.opensearch.org/latest/install-and-configure/install-opensearch/debian/
- OpenSearch 다운로드 설치 -> (선택사항) OpenSearch 테스트 -> 사용자 환경에 맞는 OpenSearch 구성
- "[방식3] APT저장소에서 OpenSearch 설치" 가이드를 중점으로 참고
▶ [방식1] APT저장소에서 OpenSearch 설치
# step01. APT 저장소 설정
#01.필요한 패키지 설치
CMD] sudo apt-get update && sudo apt-get -y install lsb-release ca-certificates curl gnupg2

#02.공개GPG(GNU Privacy Guard) 키 가져오기
CMD] curl -fsSL https://artifacts.opensearch.org/publickeys/opensearch-release.pgp \
 | sudo gpg --dearmor -o /etc/apt/keyrings/opensearch.gpg

#03.OpenSearch용 APT 저장소
CMD] echo "deb [signed-by=/etc/apt/keyrings/opensearch.gpg] https://artifacts.opensearch.org/releases/bundle/opensearch/3.x/apt stable main" \
| sudo tee /etc/apt/sources.list.d/opensearch-3.x.list

#04.저장소 생성 확인
CMD] sudo apt-get update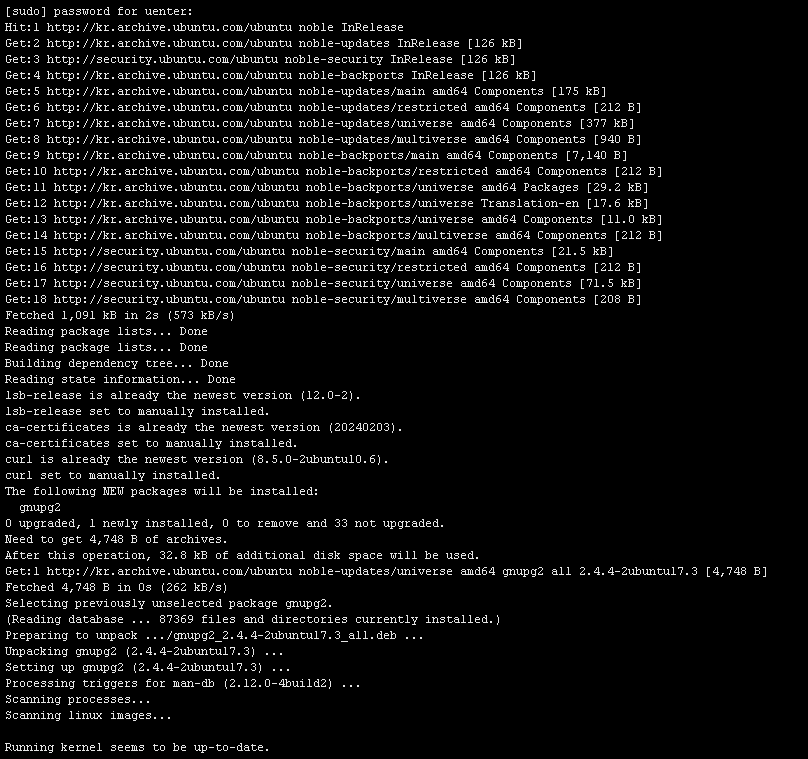


# step02. OpenSearch 패키지 설치
#01.사용 가능한 모든 OpenSearch 버전을 나열
CMD] sudo apt list -a opensearch

#02.OpenSearch 버전을 선택하여 설치
# sudo env OPENSEARCH_INITIAL_ADMIN_PASSWORD=<custom-admin-password> apt-get install opensearch=3.3.2
# OpenSearch versions 2.11 이전 : sudo apt-get install opensearch=<version>
CMD] sudo env OPENSEARCH_INITIAL_ADMIN_PASSWORD=Opensearch123! apt-get install opensearch=3.3.2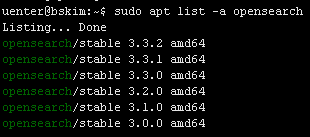
# step03. (필요시) 가져온 키가 공식 OpenSearch 릴리스 키와 일치하는지 수동으로 확인
CMD] sudo gpg --no-default-keyring --keyring /etc/apt/trusted.gpg.d/opensearch.gpg --fingerprint
# step04. OpenSearch 서비스 활성화
CMD] sudo systemctl enable --now opensearch
CMD] sudo systemctl start opensearch
CMD] sudo systemctl status opensearch.service
# step05. 방화벽 정책 등록
CMD] sudo ufw allow 9200,9300/tcp
CMD] sudo ufw reload
CMD] sudo ufw status
# step06. OpenSearch 테스트
#01.OpenSearch가 실행 중인지 확인하기 위해 서버로 요청을 보냅니다. --insecureTLS 인증서가 자체 서명되므로 플래그를 사용하는 것이 필수입니다.
# curl -X GET https://localhost:9200 -u 'admin:<custom-admin-password>' --insecure
CMD] curl -X GET https://localhost:9200 -u 'admin:Opensearch123!' --insecure

CMD] curl -X GET https://localhost:9200/_cat/plugins?v -u 'admin:Opensearch123!' --insecure

# step07. OpenSearch 설정
- OpenSearch를 호스트의 IP 또는 네트워크 인터페이스에 연결 설정
- 초기 및 최대 JVM 힙 크기를 설정
- 번들된 JDK를 가리키는 환경 변수를 정의
- 타사 인증 기관(CA) 없이도 자체 TLS 인증서를 구성
- 사용자 지정 비밀번호를 사용하여 관리자 사용자 생성
CMD] sudo vi /etc/opensearch/opensearch.yml
----------CHANGE-----------------
...
# Path to directory where to store the data (separate multiple locations by comma):
path.data: /var/lib/opensearch

# Path to log files:
path.logs: /var/log/opensearch

# Bind OpenSearch to the correct network interface. Use 0.0.0.0
# to include all available interfaces or specify an IP address
# assigned to a specific interface.
network.host: 0.0.0.0

# Unless you have already configured a cluster, you should set
# discovery.type to single-node, or the bootstrap checks will
# fail when you try to start the service.
discovery.type: single-node

# If you previously disabled the Security plugin in opensearch.yml,
# be sure to re-enable it. Otherwise you can skip this setting.
plugins.security.disabled: false
...
----------CHANGE-----------------END
CMD] sudo vi /etc/opensearch/jvm.options
----------CHANGE-----------------
# 사용 가능한 시스템 메모리의 절반으로 설정
# 호스트 머신에 4GB의 메모리가 있는 경우 초기 및 최대 힙 크기를 2GB로 설정
-Xms2g
-Xmx2g
----------CHANGE-----------------END# TLS 구성
#01.데모 인증서를 삭제
CMD] sudo sh -c 'rm /etc/opensearch/*.pem'
#02.루트 인증서를 생성하세요. 이 인증서는 다른 인증서에 서명하는 데 사용
# Create a private key for the root certificate
CMD] sudo openssl genrsa -out /etc/opensearch/root-ca-key.pem 2048
# Use the private key to create a self-signed root certificate. Be sure to replace the arguments passed to -subj so they reflect your specific host.
# 10년 만기 인증서
CMD] sudo openssl req -new -x509 -sha256 -key /etc/opensearch/root-ca-key.pem -subj "/C=KR/ST=GYEONGGI-DO/L=SUWON/O=UENTERS/OU=INFRA_Biz._Div./CN=ROOT" -out /etc/opensearch/root-ca.pem -days 3650
#03.관리자 인증서를 생성하세요. 이 인증서는 보안 플러그인과 관련된 관리 작업을 수행할 수 있는 권한을 얻는 데 사용
# Create a private key for the admin certificate.
CMD] sudo openssl genrsa -out /etc/opensearch/admin-key-temp.pem 2048
# Convert the private key to PKCS#8.
# sudo openssl pkcs8 -inform PEM -outform PEM -in /etc/opensearch/admin-key-temp.pem -topk8 -nocrypt -v1 PBE-SHA1-3DES -out /etc/opensearch/admin-key.pem
CMD] sudo openssl pkcs8 -inform PEM -outform PEM -in /etc/opensearch/admin-key-temp.pem -topk8 -nocrypt -v1 AES-256-CBC -out /etc/opensearch/admin-key.pem
# Create the certficiate signing request (CSR). A common name (CN) of "A" is acceptable because this certificate is used for authenticating elevated access and is not tied to a host.
CMD] sudo openssl req -new -key /etc/opensearch/admin-key.pem -subj "/C=KR/ST=GYEONGGI-DO/L=SUWON/O=UENTERS/OU=INFRA_Biz._Div./CN=A" -out /etc/opensearch/admin.csr
# Sign the admin certificate with the root certificate and private key you created earlier.
CMD] sudo openssl x509 -req -in /etc/opensearch/admin.csr -CA /etc/opensearch/root-ca.pem -CAkey /etc/opensearch/root-ca-key.pem -CAcreateserial -sha256 -out /etc/opensearch/admin.pem -days 3650
#04.구성 중인 노드에 대한 인증서 생성
# Create a private key for the node certificate.
CMD] sudo openssl genrsa -out /etc/opensearch/node1-key-temp.pem 2048
# Convert the private key to PKCS#8.
CMD] sudo openssl pkcs8 -inform PEM -outform PEM -in /etc/opensearch/node1-key-temp.pem -topk8 -nocrypt -v1 AES-256-CBC -out /etc/opensearch/node1-key.pem
# Create the CSR and replace the arguments passed to -subj so they reflect your specific host.
# The CN should match a DNS A record for the host-do not use the hostname.
CMD] sudo openssl req -new -key /etc/opensearch/node1-key.pem -subj "/C=KR/ST=GYEONGGI-DO/L=SUWON/O=UENTERS/OU=INFRA_Biz._Div./CN=node1.dns.a-record" -out /etc/opensearch/node1.csr
# Create an extension file that defines a SAN DNS name for the host. This should match the DNS A record of the host.
CMD] sudo sh -c 'echo subjectAltName=DNS:node1.dns.a-record > /etc/opensearch/node1.ext'
# Sign the node certificate with the root certificate and private key that you created earlier.
CMD] sudo openssl x509 -req -in /etc/opensearch/node1.csr -CA /etc/opensearch/root-ca.pem -CAkey /etc/opensearch/root-ca-key.pem -CAcreateserial -sha256 -out /etc/opensearch/node1.pem -days 3650 -extfile /etc/opensearch/node1.ext
#05.더 이상 필요하지 않은 임시 파일을 제거
CMD] sudo sh -c 'rm -f /etc/opensearch/*temp.pem /etc/opensearch/*.csr /etc/opensearch/*.ext'
#06.나머지 인증서가 opensearch 사용자의 소유인지 확인
CMD] sudo chown opensearch:opensearch /etc/opensearch/admin-key.pem /etc/opensearch/admin.pem /etc/opensearch/node1-key.pem /etc/opensearch/node1.pem /etc/opensearch/root-ca-key.pem /etc/opensearch/root-ca.pem /etc/opensearch/root-ca.srl
#07./etc/opensearch/opensearch.yml 에 설명된 대로 이러한 인증서를 추가
CMD] sudo vi /etc/opensearch/opensearch.yml
---------------------쉘실행 또는 명령어 수행-----------------------
echo "plugins.security.ssl.transport.pemcert_filepath: /etc/opensearch/node1.pem" | sudo tee -a /etc/opensearch/opensearch.yml
echo "plugins.security.ssl.transport.pemkey_filepath: /etc/opensearch/node1-key.pem" | sudo tee -a /etc/opensearch/opensearch.yml
echo "plugins.security.ssl.transport.pemtrustedcas_filepath: /etc/opensearch/root-ca.pem" | sudo tee -a /etc/opensearch/opensearch.yml
echo "plugins.security.ssl.http.enabled: true" | sudo tee -a /etc/opensearch/opensearch.yml
echo "plugins.security.ssl.http.pemcert_filepath: /etc/opensearch/node1.pem" | sudo tee -a /etc/opensearch/opensearch.yml
echo "plugins.security.ssl.http.pemkey_filepath: /etc/opensearch/node1-key.pem" | sudo tee -a /etc/opensearch/opensearch.yml
echo "plugins.security.ssl.http.pemtrustedcas_filepath: /etc/opensearch/root-ca.pem" | sudo tee -a /etc/opensearch/opensearch.yml
echo "plugins.security.allow_default_init_securityindex: true" | sudo tee -a /etc/opensearch/opensearch.yml
echo "plugins.security.authcz.admin_dn:" | sudo tee -a /etc/opensearch/opensearch.yml
echo " - 'CN=,OU=INFRA_Biz._Div.,O=UENTERS,L=SUWON,ST=GYEONGGI-DO,C=KR'" | sudo tee -a /etc/opensearch/opensearch.yml
echo "plugins.security.nodes_dn:" | sudo tee -a /etc/opensearch/opensearch.yml
echo " - 'CN=node1.dns.a-record,OU=UENTERS,O=ORG,L=SUWON,ST=GYEONGGI-DO,C=KR'" | sudo tee -a /etc/opensearch/opensearch.yml
echo "plugins.security.audit.type: internal_opensearch" | sudo tee -a /etc/opensearch/opensearch.yml
echo "plugins.security.enable_snapshot_restore_privilege: true" | sudo tee -a /etc/opensearch/opensearch.yml
echo "plugins.security.check_snapshot_restore_write_privileges: true" | sudo tee -a /etc/opensearch/opensearch.yml
echo "plugins.security.restapi.roles_enabled: [\"all_access\", \"security_rest_api_access\"]" | sudo tee -a /etc/opensearch/opensearch.yml
---------------------쉘실행 또는 명령어 수행-----------------------END
#08.(선택 사항) 자체 서명된 루트 인증서에 대한 신뢰를 추가
# Copy the root certificate to the correct directory
CMD] sudo install -m 0644 /etc/opensearch/root-ca.pem /usr/local/share/ca-certificates/root-ca.crt
# Add trust
CMD] sudo update-ca-certificates#사용자 구성
#01.보안 플러그인 도구 디렉토리로 이동
CMD] cd /usr/share/opensearch/plugins/opensearch-security/tools
#02.새로운 비밀번호를 생성하기 위해 hash.sh 실행
# JDK 경로가 정의되어 있어야 함.
CMD] OPENSEARCH_JAVA_HOME=/usr/share/opensearch/jdk ./hash.sh
-> [Password:] Opensearch123!
-> $2y$12$VT71oVeEFCfTyviWP05kFejwch6kAPUfxMSiZPU2n8am2Izzg1fa6
※ 프롬프트에 원하는 비밀번호를 입력하고 출력 해시를 기록
#03.internal_users.yml 내용 추가
CMD] sudo vi /etc/opensearch/opensearch-security/internal_users.yml
-----------------------ADD--------------
_meta:
type: "internalusers"
config_version: 2
...
user1:
hash: "$2y$12$VT71oVeEFCfTyviWP05kFejwch6kAPUfxMSiZPU2n8am2Izzg1fa6"
reserved: false
backend_roles: []
description: "New internal user"
...
-----------------------ADD--------------END# step08. 변경 사항 적용
#TLS 인증서가 설치되고 데모 사용자가 제거되거나 새 비밀번호가 할당되었으므로 마지막 단계는 구성 변경 사항을 적용하는 것입니다. 이 마지막 구성 단계에서는 securityadmin.sh호스트에서 OpenSearch가 실행 중인 동안 를 호출해야 함
CMD] sudo systemctl restart opensearch
CMD] sudo systemctl status opensearch

CMD] cd /usr/share/opensearch/plugins/opensearch-security/tools

#스크립트를 호출
# You can omit the environment variable if you declared this in your $PATH.
CMD] sudo OPENSEARCH_JAVA_HOME=/usr/share/opensearch/jdk ./securityadmin.sh -cd /etc/opensearch/opensearch-security/ -cacert /etc/opensearch/root-ca.pem -cert /etc/opensearch/admin.pem -key /etc/opensearch/admin-key.pem -icl -nhnv
# step09. 서비스가 실행 중인지 확인
# 클라이언트에 루트 인증서에 대한 신뢰를 추가해야 하지만, 인증서를 추가하지 않으면 cURL이 CN 및 루트 인증서 유효성 검사를 무시하도록 -k 옵션을 사용해야 함
# curl https://localhost:9200 -u admin:<yournewpassword> -k
CMD] curl https://localhost:9200 -u admin:Opensearch123! -k

CMD] curl -k --user "admin:Opensearch123!" https://localhost:9200/_cat/health

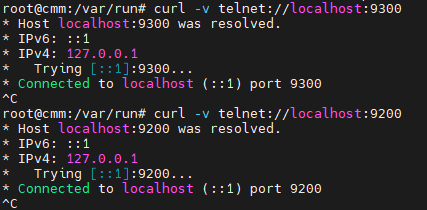
# step10. 리스팅 포트 확인
CMD] sudo netstat -nltp | grep java

# step11. Opensearch 인덱스 생성 테스트
CMD] curl -k -u admin:Opensearch123! -X PUT "https://localhost:9200/my-ix1?pretty"
# step12. 데이터 입력 테스트
CMD] curl -k -u admin:Opensearch123! -X POST "https://localhost:9200/my-ix1/_doc/1?pretty" -H 'Content-Type: application/json' -d'
{
  "title": "데이터1",
  "content": "첫번째 데이터 입니다."
}'
# step13. 데이터 조회/검색 테스트
CMD] curl -k -u admin:Opensearch123! -X GET "https://localhost:9200/my-ix1/_search?pretty" -H 'Content-Type: application/json' -d'
{
  "query": {
    "match": {
      "title": "데이터1"
    }
  }
}'
▶ [방식2] Offline 패키지에서 OpenSearch 설치
# step01. OpenSearch debian 패키지 다운로드
- https://opensearch.org/downloads/ -> OpenSearch -> platform:linux, Package: x64/Deb -> Download 버튼 클릭 -> "opensearch-3.3.2-linux-x64.deb" 파일 저장
- https://opensearch.org/downloads/ -> OpenSearch Dashboards -> platform:linux, Package: x64/Deb -> Download 버튼 클릭 -> "opensearch-dashboards-3.3.0-linux-x64.deb" 파일 저장
# step02. CLI에서 패키지 설치
CMD] sudo mkdir -p /app/instl/opensearch
CMD] sudo chown uenter:uenters -R /app

CMD> scp opensearch-3.3.2-linux-x64.deb root@192.168.31.172:/app/instl/opensearch
CMD> scp opensearch-dashboards-3.3.0-linux-x64.deb root@192.168.31.172:/app/instl/opensearch
# wget https://artifacts.opensearch.org/releases/bundle/opensearch/3.3.2/opensearch-3.3.2-linux-x64.tar.gz
# tar -xvzf opensearch-3.3.2-linux-x64.tar.gz -C /app

# OpenSearch 2.12 이상을 새로 설치하는 경우, 데모 보안 구성을 설정하려면 사용자 지정 관리자 비밀번호를 정의
# sudo env OPENSEARCH_INITIAL_ADMIN_PASSWORD=<custom-admin-password> dpkg -i opensearch-3.3.2-linux-x64.deb
# OpenSearch 버전 2.11 및 이전 버전의 경우 다음 명령을 사용하세요.
# sudo dpkg -i opensearch-<version>-linux-x64.deb

CMD] cd /app/instl/opensearch
CMD] sudo env OPENSEARCH_INITIAL_ADMIN_PASSWORD=Opensearch123! dpkg -i opensearch-3.3.2-linux-x64.deb
# step03. OpenSearch를 서비스로 활성화
CMD] sudo systemctl enable --now opensearch
CMD] sudo systemctl start opensearch
CMD] sudo systemctl status opensearch.service

# step04. 방화벽 정책 등록 및 서비스 테스트
[방식1] #step05 이후 내용 참고
▶ [방식3] 지문인증 방식으로 설치
# step01. Fingerprint verification(지문인증)
- 데비안 패키지는 서명되지 않음. 지문을 확인하기 위해, OpenSearch 프로젝트에서는 GNU Privacy Guard(GPG)와 사용할 수 있는 .sig파일과 .deb패키지를 제공
CMD] sudo mkdir -p /app/instl/opensearch
CMD] sudo chown uenter:uenters -R /app

#01.원하는 데비안 패키지를 다운로드
CMD] curl -SLO https://artifacts.opensearch.org/releases/bundle/opensearch/3.3.2/opensearch-3.3.2-linux-x64.deb

#02.해당 서명 파일을 다운로드
CMD] curl -SLO https://artifacts.opensearch.org/releases/bundle/opensearch/3.3.2/opensearch-3.3.2-linux-x64.deb.sig

#03.GPG 키를 다운로드하고 가져오기
CMD] curl -o- https://artifacts.opensearch.org/publickeys/opensearch-release.pgp | gpg --import -

#04.서명을 확인
CMD] gpg --verify opensearch-3.3.2-linux-x64.deb.sig opensearch-3.3.2-linux-x64.deb
# step02. CLI에서 패키지 설치
CMD] cd /app/instl/opensearch
CMD] sudo env OPENSEARCH_INITIAL_ADMIN_PASSWORD=Opensearch123! dpkg -i opensearch-3.3.2-linux-x64.deb
# step03. OpenSearch를 서비스로 활성화
CMD] sudo systemctl enable --now opensearch
CMD] sudo systemctl start opensearch
CMD] sudo systemctl status opensearch.service
# step04. 방화벽 정책 등록 및 서비스 테스트
[방식1] #step05 이후 내용 참고
▶ [방식4] Offline .tar.gz 파일에서 OpenSearch 설치
# step01. OpenSearch 압축 파일 다운로드 및 압축 풀기
CMD] sudo mkdir -p /app/instl/opensearch
CMD] sudo chown uenter:uenters -R /app

CMD> sudo wget https://artifacts.opensearch.org/releases/bundle/opensearch/3.3.2/opensearch-3.3.2-linux-x64.tar.gz
CMD> sudo tar -xvzf opensearch-3.3.2-linux-x64.tar.gz -C /app
# step02. OpenSearch 설치
CMD] mkdir -p /home/opensearch

CMD] sudo useradd opensearch
CMD] sudo passwd opensearch
CMD] sudo chown -R opensearch:opensearch /app/opensearch-3.3.2
CMD] sudo passwd opensearch

CMD] sudo mkdir -p /var/run/opensearch
CMD] sudo chown -R opensearch:opensearch /var/run/opensearch

CMD] sudo chown -R opensearch:opensearch /home/opensearch

CMD] sudo -u opensearch ./opensearch-tar-install.sh
# step03. 보안 인증 비활성화 후 테스트 모드로 백그라운드 실행 확인
CMD] nohup ./bin/opensearch -E "discovery.type=single-node" -E "plugins.security.disabled=true" &# step04. OpenSearch 서비스 파일 등록
CMD] sudo vi /etc/systemd/system/opensearch.service
------------------ADD----------------------
[Unit]
Description=OpenSearch
Wants=network-online.target
After=network-online.target

[Service]
Type=forking
User=opensearch
Group=opensearch
ExecStart=/app/opensearch-3.3.2/bin/opensearch -E "discovery.type=single-node" -E "plugins.security.disabled=true" -d -p /var/run/opensearch/opensearch.pid
PIDFile=/var/run/opensearch/opensearch.pid
Restart=on-failure
LimitNOFILE=65536
LimitNPROC=65536

[Install]
WantedBy=multi-user.target
------------------ADD----------------------END
# step05. OpenSearch 서비스 활성화
CMD] sudo systemctl daemon-reload
CMD] sudo systemctl enable --now opensearch.service
CMD] sudo systemctl start opensearch

CMD] sudo systemctl status opensearch
# step06. 방화벽 정책 등록 및 서비스 테스트
[방식1] #step05 이후 내용 참고
▶ [방식1] APT저장소에서 OpenSearch Dashboards 설치
■ 작업순서 (OpenSearch Dashboards)
# step01. APT 저장소 설정
#01.필요한 패키지를 설치
CMD] sudo apt-get update && sudo apt-get -y install lsb-release ca-certificates curl gnupg2

#02.공개 GPG 키 가져오기
CMD] curl -o- https://artifacts.opensearch.org/publickeys/opensearch-release.pgp | sudo gpg --dearmor --batch --yes -o /etc/apt/keyrings/opensearch-release-keyring

#03.OpenSearch-Dashboards용 APT 저장소를 생성
CMD] echo "deb [signed-by=/etc/apt/keyrings/opensearch-release-keyring] https://artifacts.opensearch.org/releases/bundle/opensearch-dashboards/3.x/apt stable main" | sudo tee /etc/apt/sources.list.d/opensearch-dashboards-3.x.list

#04.저장소가 성공적으로 생성되었는지 확인
CMD] sudo apt-get update
# step02. OpenSearch Dashboards 패키지 설치
#01.사용 가능한 모든 OpenSearch Dashboards 버전을 확인
CMD] sudo apt list -a opensearch-dashboards

#02.OpenSearch Dashboards의 특정 버전을 설치하려면 패키지 이름 뒤에 버전 번호를 지정
CMD] sudo apt-get install opensearch-dashboards=3.3.0
#   버젼을 명시하지 않으면, 사용 가능한 최신 버전의 OpenSearch Dashboards가 설치됨
#   sudo apt-get install opensearch-dashboards
# step03. OpenSearch Dashboards 서비스 활성화
 CMD] sudo systemctl enable --now opensearch-dashboards
 CMD] sudo systemctl start opensearch-dashboards
 CMD] sudo systemctl status opensearch-dashboards
# step04. OpenSearch Dashboards 설정 확인
#01.opensearch_dashboards.yml 설정 값 변경
CMD] sudo vi /etc/opensearch-dashboards/opensearch_dashboards.yml
---------------CHANGE-----------------
server.host: 0.0.0.0
---------------CHANGE-----------------END

#02.설정 변경 사항을 적용하려면 OpenSearch 대시보드를 다시 시작
CMD] sudo systemctl restart opensearch-dashboards
# step05. 방화벽 정책 등록
CMD] sudo ufw allow 5601/tcp
CMD] sudo ufw reload
CMD] sudo ufw status
▶ [방식2] Offline 파일에서 OpenSearch Dashboards 설치
# step01. OpenSearch Dashboards 패키지 다운로드 및 압축 해제
mkdir -p /app/opensearch-dashboards-3.3.0
mkdir -p /app/instl/opensearch-dashboards
wget https://artifacts.opensearch.org/releases/bundle/opensearch-dashboards/3.3.0/opensearch-dashboards-3.3.0-linux-x64.tar.gz
tar -xvzf opensearch-dashboards-3.3.0-linux-x64.tar.gz -C /app
cd /app/opensearch-dashboards-3.3.0
sudo chown -R opensearch:opensearch /app/opensearch-dashboards-3.3.0
# step02. OpenSearch Dashboards 서비스 파일 등록
CMD] sudo vi /etc/systemd/system/opensearch-dashboards.service
-------------------------ADD-------------------
[Unit]
Description=OpenSearch Dashboards
Documentation=https://opensearch.org/
After=network.target

[Service]
User=opensearch
Group=opensearch
WorkingDirectory=/app/opensearch-dashboards-3.3.0
ExecStart=/app/opensearch-dashboards-3.3.0/bin/opensearch-dashboards --config /app/opensearch-dashboards-3.3.0/config/opensearch_dashboards.yml
Restart=always
RestartSec=3s

[Install]
WantedBy=multi-user.target
-------------------------ADD-------------------END
# step03. OpenSearch Dashboards 서비스 실행
CMD] sudo systemctl daemon-reload
CMD] sudo systemctl enable --now opensearch-dashboards.service
CMD] sudo systemctl start opensearch-dashboards.service

CMD] sudo systemctl status opensearch-dashboards.service
▶ OpenSearch와 OpenSearch Dashboards SSL 인증 비활성화 사용(개발/테스트 환경 용도)
■ 작업순서
# step01. OpenSearch SSL 인증 비활성화
CMD]$ sudo vi /etc/opensearch/opensearch.yml
---------CHANGE--------------
plugins.security.disabled: true
---------CHANGE--------------END

CMD]$ systemctl restart opensearch.service

# OpenSearch 상태 확인 (SSL 비인증 모드)
CMD]$ curl http://192.168.31.172:9200/_cat/health
1766555122 05:45:22 opensearch yellow 1 1 true 34 34 0 0 1 0 - 97.1%
# step02. OpenSearch-Dashboards SSL 인증 비활성화
CMD]$ sudo vi /etc/opensearch-dashboards/opensearch_dashboards.yml
---------------CHANGE/ADD------------
opensearch.hosts: [http://localhost:9200]
...
opensearch_security.multitenancy.enabled: false
opensearch_security.enabled: false
...
---------------CHANGE/ADD------------END

CMD]$ sudo systemctl restart opensearch-dashboards.service

CMD> http://192.168.31.172:5601 접속 확인

'Linux > Ubuntu' 카테고리의 다른 글
| [Ubuntu/v24.04.3 LTS] 리눅스 계정 생성 및 그룹 생성 (0) | 2025.11.25 |
|---|---|
| [OpenSearch] 오픈서치(OpenSearch) v3.3.2 admin 계정 비번 초기화 (0) | 2025.11.24 |
| [Grafana/Promtail] 그라파나(Grafana) Promtail 설치 (0) | 2025.11.21 |
| [Grafana/Loki] 그라파나(Grafana) Loki 설치 (0) | 2025.11.21 |
| [Grafana/Linux/Ubuntu/24.04.3LTS] 그라파나(Grafana) 설치 가이드 (0) | 2025.11.21 |